
Epic Seven Equipment Guide [Gearing and Enhancing Recommendations]
![Epic Seven Equipment Guide [Gearing and Enhancing Recommendations]](https://epic7x.com/wp-content/uploads/2019/02/equip.jpg)
Table of Contents
Overview
Welcome to the basic guide for equipment. In Epic Seven, gearing your character is one of the most important parts of the game. Not optimizing the stats you need for a character will hinder your progress in various stages in the game.
Most characters are viable in all PvE content if you invest in them enough. So let’s go over the basics you need to know about gear in general.
Equipment Basics
Each gear will have the following things attached:
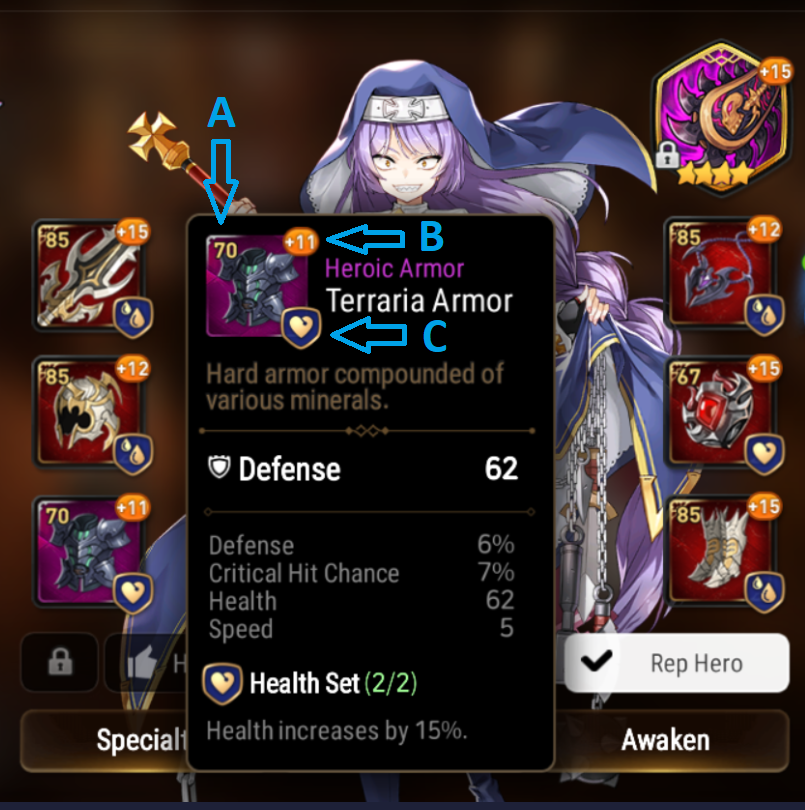
- A – This indicates the item level or tier. The higher the number, the better the tier. This ranges from 1-100. Higher tier gear have better main stats and higher rolls for substats.
- B – This tells you what level the gear is at. It starts at 0 and can be enhanced all the way to +15.
- C – This tells you the gear set it belongs to. Matching sets will give you some bonus stats. We will be going over this below.
You can equip 6 gear slots and 1 artifact for any given character. Below are the main stats for each gear slot.
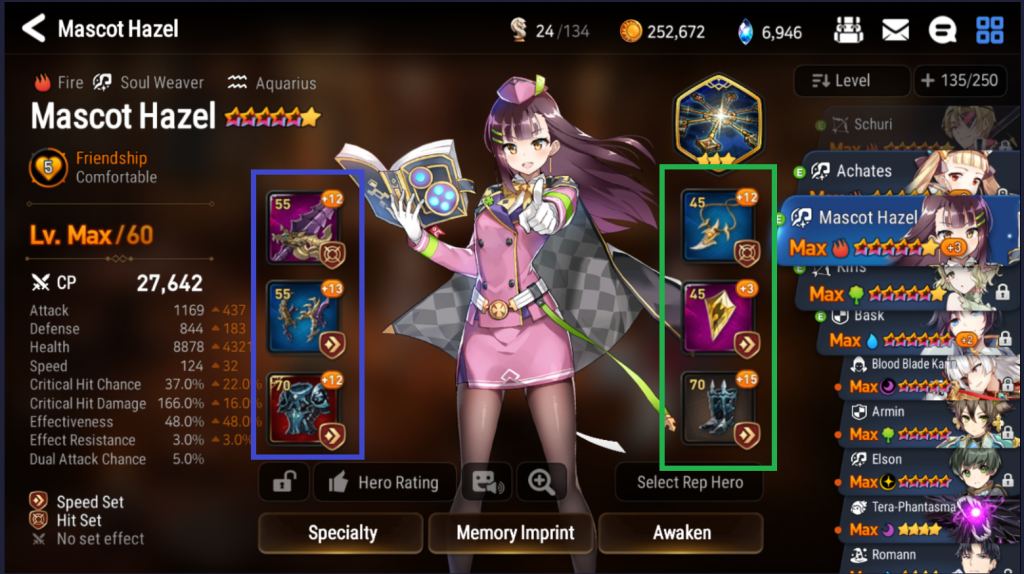
Left Side (Blue)
- Weapon – Flat attack as main stat
- Helm – Flat health as main stat
- Armor – Flat defense as main stat
Right Side (Green)
These are the pieces that matter the most. They give % main stats, which is what scales the character. Bonus tip, never use flat stats as the main stat on the right side of the gear ever. It is absolutely a terrible return of investment.
- Necklace – Main stat can be Flat attack, flat defense, flat hp, atk%, hp%, def%, crit rate % or crit damage%
- Ring – Main stat can be flat attack, flat defense, flat hp, atk%, hp%, def%, effectiveness% and effect resistance%
- Boots – Main stat can be flat attack, flat defense, flat hp, atk%, hp%, def% and speed
- Artifact – Always provides flat attack, health and the artifact’s special effect
As you can see, the main stat for weapon, helm and armor stays the same. Only necklace, ring and boots can have varying main stats. Only boots can roll speed as main stat, rings with effectiveness%/effect resistance% and crit rate%/crit damage% for necklace.
Effectiveness affects how accurate your debuffs will land on the enemy while effect resistance will affect enemy’s debuffs on your character. Currently, effect resistance isn’t the most useful stat and I suggest you focus on everything else.
This table below gives you a nice view of what stats and substats each slot can roll.
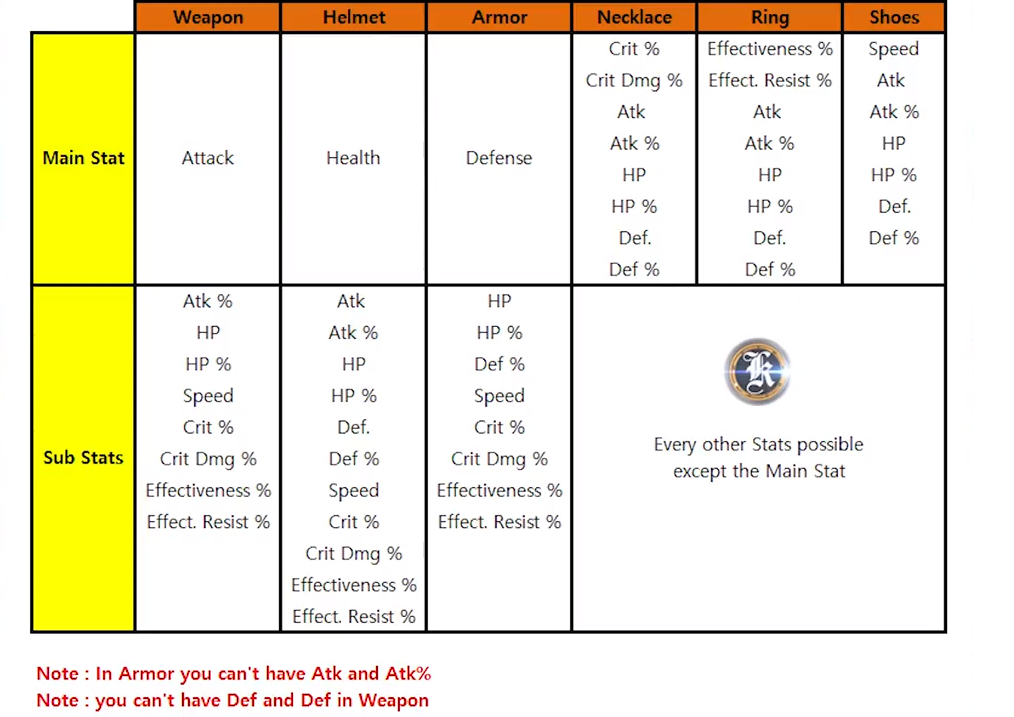
Source: K Gaming: https://www.youtube.com/watch?v=ClQ8RA-aTT8
Update: with the flat stat buffs, some characters actually can benefit from flat necklaces, rings or boots. Have a look at the document below by Hax R Us which you can click here to find out who can benefit from flat stats. The main ones include the Banshee sisters, Jecht, Hazel, Roozid and Tamarrine.
Equipment Grade and Main Stats
There are currently 5 types:
- Normal – No bonus substat
- Uncommon – 1 bonus substat
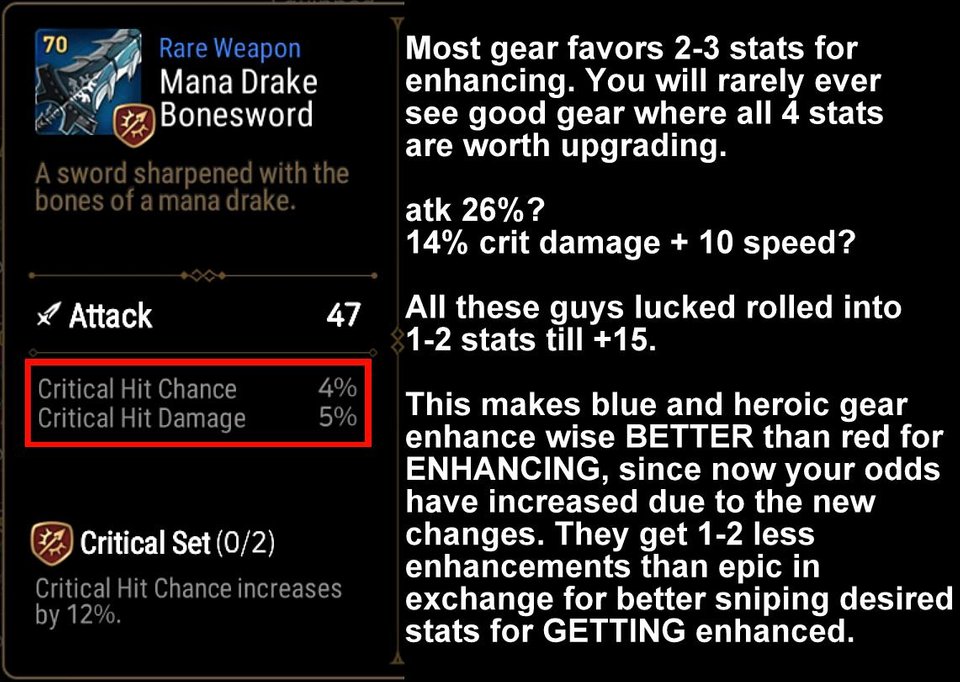
- Rare– 2 bonus substats
- Heroic – 3 bonus substats
- Epic – 4 bonus substats
All gear of the same tier will have the same main stat regardless of rarity. Since the update changes for the tiers, the old format now reads like this:
- T1 – 1 to 15
- T2 – 16 to 30
- T3 – 31 to 45
- T4 – 46 to 60
- T5 – 61 to 75
- T6 – 76 to 90
- T7 – 90+
Equipment Substats
Each gear can have up to 4 sub stats. Below are the options you can have:
- Weapon – Atk%, flat hp, hp%, speed, crit rate%, crit damage%, effectiveness, effect resistance%
- Helmet – Flat atk, atk%, flat hp, hp%, flat def, def%, speed, crit rate%, crit damage%, effectiveness, effect resistance%
- Armor – Flat hp, hp%, speed, crit rate%, crit damage%, effectiveness, effect resistance%
- Necklace, Ring and Boots – Everything except the main stat
Gear Sets
Each gear will have a set bonus that can either be acquired by wearing 2 or 4 pieces of the same type. You can see what set bonuses you have by looking at the bottom left corner of the character page. Currently, you can have the following sets:
- Health – Gives +15% health (2 pieces)
- Defense – Gives +15% defense (2 pieces)
- Attack – Gives +35% attack (4 pieces)
- Speed – Gives 25% speed (4 pieces)
- Critical – Gives +12% critical rate (2 pieces)
- Hit Rate – Gives +20% effectiveness(2 pieces)
- Destruction – Gives +40% critical damage (4 pieces)
- Lifesteal – Gives +20% lifesteal of the damage dealt to enemies (4 pieces)
- Counter – Gives +20 chance to counter attack when attacked. (4 pieces)
- Resist – Gives +20% effect resistance(2 pieces)
- Unity – Gives +4% chance to trigger dual attack (2 pieces)
- Rage – Gives +30% damage when the enemy is debuffed (4 pieces)
- Immunity – Gives 1 turn immunity buff at the start of each battle phase (2 pieces)
If you are looking to farm/hunt for specific gear sets, I have categorized them below:
- Golem Hunt – Health, Defense and Attack sets
- Wyvern Hunt – Speed, Hit Rate and Critical sets
- Banshee Hunt – Destruction, Lifesteal, Counter and Resist sets
- Labyrinth Raid – Unity, Rage, Immunity and all other sets
Upgrading/Enhancing
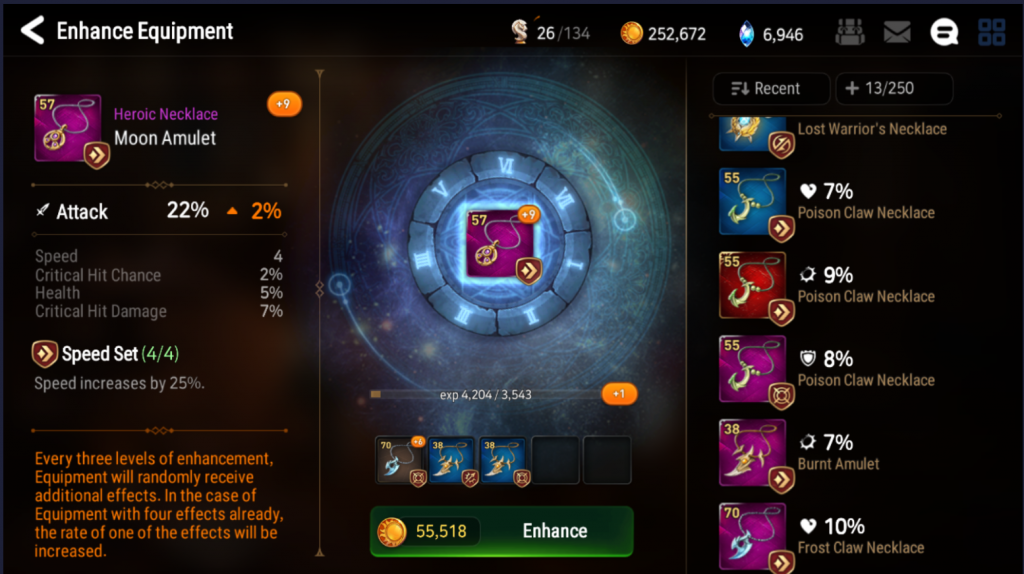
When you upgrade an equipment, there is a break point for every 3 levels, up to 15. Every 3 levels, your equipment will either further improve a current substats stats.
Upgrading is also expensive and on average costs 1 million gold+ to enhance a tier 6 item to +15.
Update: Now the rules have changed.
Below is how it works:

The easiest way to explain it is below by projectwar:
For those that want some stats, have a look at this reddit post:
Charms vs Normal Gear
White Charm (1500 exp)
Black Charm (4500 exp)
Red Charm (13500 exp)
Charms are a great way to enhance gear and is more gold efficient. However, they are more scarce and not easy to find. Normal gear on the other hand, is less gold efficient but you can upgrade faster as you get more of them in adventure mode.

Find Huche Here
You can find Huche in the Labyrinth (Tirel Castle Zone 1) to buy charms, but I suggest you not do that unless you are desperate for upgrading. Gold is scarce in this game and you don’t want to be wasting it for quick upgrades.
I made this for new E7 players- Plz take advantage of this to ‘Enhance’ your account!
byu/PlmokBro inEpicSeven
Charms can be gotten in various ways:
- Regular adventure map (drops white charms that gives 1500 exp)
- Huche (sometimes he sells red charms)
- Conquest shop gives weapon, helmet, armor and boot charms (white and black)
- Ancient coin shop gives accessory charms(white and black)
- Transmit stone shop also gives accessory charms (not recommended to buy unless you are desperate for an important upgrade)
- Challenge Quests (rarely ever drop the black charms, but the white charms can drop)
- Raid Labyrinth (Red Accessory Charms can be traded using raid currency)
Vyntarus from Reddit give an excellent breakdown on the cost efficiency of charms vs equipment:
Gear Enhancement Multipliers
QuazzyWazzy was able to come up with the gear multipliers when upgrading gear.
| Level | Multiplier | Increment |
|---|---|---|
| +0 | 1x | |
| +1 | 1.2x | 0.2 (+4%) |
| +2 | 1.4x | 0.2 (+4%) |
| +3 | 1.6x | 0.2 (+4%) |
| +4 | 1.8x | 0.2 (+4%) |
| +5 | 2x | 0.2 (+4%) |
| +6 | 2.2x | 0.2 (+4%) |
| +7 | 2.4x | 0.2 (+4%) |
| +8 | 2.6x | 0.2 (+4%) |
| +9 | 2.8x | 0.2 (+4%) |
| +10 | 3x | 0.2 (+4%) |
| +11 | 3.3x | 0.3 (+6%) |
| +12 | 3.6x | 0.3 (+6%) |
| +13 | 3.9x | 0.3 (+6%) |
| +14 | 4.25x | 0.35 (+7%) |
| +15 | 5x | 0.75 (+15%) |
Early on, the mutiplier increases linearly and then it spikes at the end. Starting from the base value, the multiplier increments by 0.20 up until +10. From there to +13 it rises to 0.30. At +14 it’s at 0.35 and finally at +15 it jumps to 0.75, which is more than double of the previous increments.
If there’s anything to take in here, it’s that get your right side gear to +15 ASAP, the +15% main stat boost is pretty big.
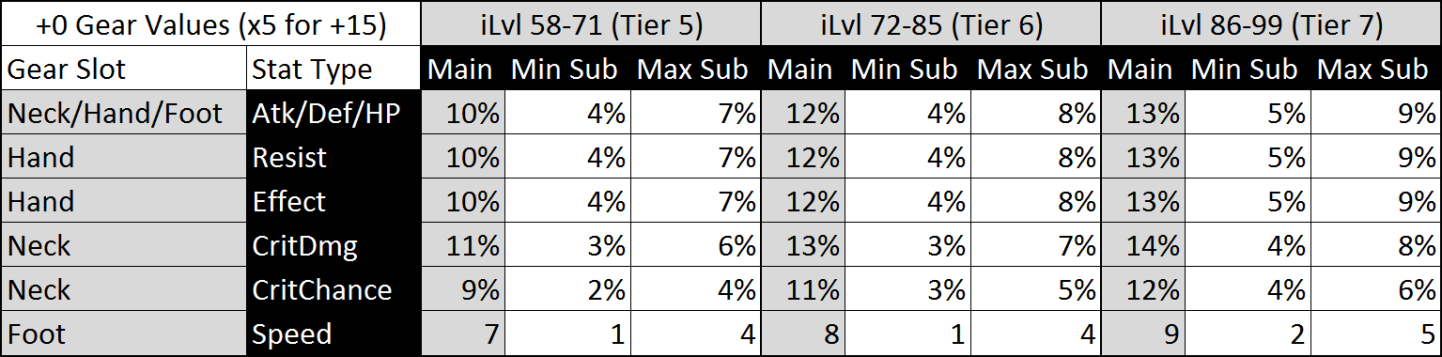
Substat Range
The substat range also varies for different tiers, but higher tier gear will have a higher range. Below is the substat range from Shipposting_Duck:
Gear Recommendations For Different Roles
Now that you have a good idea of how equipment works, let’s go over the recommendations for various roles in the game. I have grouped them under the following. Do keep in mind that some characters overlap in various groups.
Single Target/AoE DPS?
These are your standard damage dealers, which the game has no shortage of. There are usually two types of damage dealers. The first one is a pure damage dealer. The second type is a damage dealer with debuffs such as defense break, burn, bleed etc.
Pure Damage Dealers


For raw damage dealers, you will want as much attack, crit rate% and crit damage%. It also helps if you can get some speed substats so they aren’t too slow. 120+ speed would be good.
Recommended sets are (set and right side main stats):
- Attack/Crit Rate% (Crit R%, Atk%, Atk%)
- Destruction/Crit Rate% (Crit Damage%, Atk%, Atk% or Speed)
Damage Dealers/Bruisers with Debuff


Characters in this category scale with dealing mixed damage. Any character that has bleed, burn, poison or any damage over time effects will require some effectiveness, especially against tougher bosses with high effect resistance. Look for speed and effectiveness substats so you don’t have to use it on the right side equipment.
Recommended sets are (set and right side main stats):
- Attack/Hit Rate% – (Atk%, Atk%, Atk%)
- Speed/Hit Rate% – (Atk%, Atk%, Speed)
Second set is more for PvP as you need to go first to apply debuffs. For more niche units like Kiris or any character that relies on poison to do damage, the recommended set is:
- Speed/Hp – (Hp%,Effectiveness%, Speed)
Their main damage source is over time, so they need to survive and move as fast as possible to stack those effects.
Bruisers (Ken, Cartuja etc.) that scale with health will also benefit from some attack, defense and effectiveness. For bruiser type debuffers:
- Speed/Hp – (Hp%,Hp%, Hp%)
- Counter/Hp – (Hp%,Hp%, Hp%) -> Great if their first skill has a debuff
Buffers


Most buffers are further split into 2 types -> Offensive and Defensive.
For example, Hazel and Yuna are offensive buffers since they offer attack up and scale better with attack stat. Other’s like Rose and Diene scale better with health since they need to be tanky and durable to be more efficient.
For offensive buffers:
- Speed/Crit Rate (Atk%,Atk%, Speed)
For defensive buffers (Diene, Rose etc.):
- Speed/Hp – (Hp%,Hp%, Speed)
Dispel


Dispellers are vital to your progress in both PvE and PvP. Stripping enemy buffs can be a life saver in many situations, particularly in the Abyss tower.
For damage dealer type dispellers, it is best to build some attack and effectiveness.
- Speed/Crit Rate – (Atk%,Atk%, Speed)
- Lifesteal/Crit Rate – (Atk%,Atk%, Atk%) -> You can do this using the Abyss gear
Defense and effectiveness goes a long way for tanky dispellers. I recommend they go:
- Speed/Hp – (Hp%,Hp%, Speed)
Tanks and Healers


Most healers do well, especially if their heals scale of max health of either theirs or the allies max health. Most common and best set for healers are health or speed sets. Healers also benefit a lot from defense and speed. Since most healers are slow, it is best to use a speed boot if you can find them.
- Hp/Hp/Hp – (Hp%, Hp%, Speed)
- Speed/Hp – (Hp%, Hp%, Speed)
Most tanks don’t do much damage, so defense and health goes a long way. It also helps if they have some speed substats.
- Def/Hp/Hp – (Hp%, Hp%, Def%)
Krau is a bit of a unique tank since his third skill deals damage off his missing health. In this case:
- Lifesteal/Hp – (Hp%/Hp%/Hp%)
PvP Focused

In Champion arena and higher, immunity sets become more important. This is more of an end game set and most players won’t venture into this territory.
- Destruction/Immunity – (Crit R%, Atk%, Speed or Atk%)
- Speed/Immunity – (Hp%, Hp%, Hp%)
Immunity will ensure your damage dealers or combat readiness pushers won’t be stunned or lose their turn on the first round.
Conclusion
Hopefully this guide will have given you all the basics you need to know about gearing your characters. Happy hunting!